Bathroom modernised including led lights and extractor fan
Whenever people think about modernizing their bathroom, normally it is just the bathroom suite with the bath, toilet, taps and tiles that are considered. A modernization of a bathroom can go well past this. It is possible to move items such as the pull chord light switch, add ceiling lights and an extractor fan.
Coventry bathrooms explain how to convert a bathroom to a shower room
In this video, Coventry bathrooms explain how to convert a bathroom to a shower room
With a little bit of thought, you can create a perfect floor plan for a shower room conversion. Make sure you use any leftover floor space if possible. In most houses we convert, we find that if we use a shower tray between 100cm and 1200cm there is then enough room to move the basin from the window wall and fit it in the space between the end of the shower and the window wall.
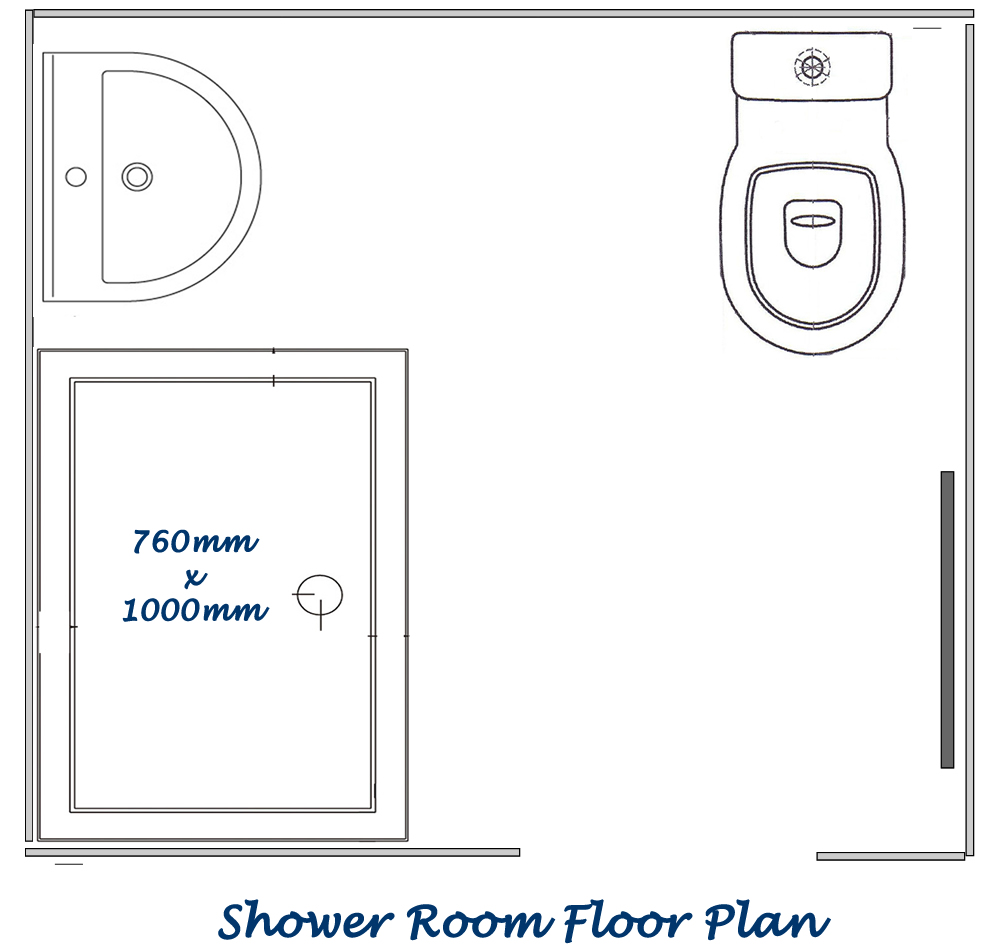
The width of the shower tray will also impact onto the floor space of the room, 76cm – 80cm shower tray offers more than enough room. It is possible to fit 90cm – 100cm wide shower trays, but you will find they take up too much valuable floor space.
We suggest that a shower tray 800cm – 1200cm is the ideal shower size in most cases.
Bathroom to shower room Conversion Video
This video shows the correct steps that need to be taken to convert a bathroom to a shower room. It demonstrates that floor space can be created by first fitting a suitable lengthed shower tray, in this case a 100cm long tray, and then moving the basin (sink) from the window wall to the area at the end of the shower. It is worth noting that it wasnt possible to fit a vanity basin in this area.
Wet Room Conversion Coventry
On many occasions we have home owners that contact us with a bathroom wish list which includes fitting the bathroom as a wet room. In many homes a wet room is neither economically plausible nor necessary. A well designed shower room will offer most of the function and other benefits over a wet room.
Converting the bathroom to a shower room is much easier than converting it to a wet room. The waste water from the shower is a problem that needs to be resolved. If the shower is set above the ground by between 3 – 4 inchs (7cm – 10cm) it will then be easy and quick to fit the waste water pipe from the shower to the outside drain. However if the shower is to be at floor height, the waste water will need to run below ground level with the waste pipe having to be cut into the wall under ground level and into the exterior drains. I am sure you can visualize how this would add problems and work to the conversion.
This house has a downstairs bathroom, the waste pipe from the bath runs to the outside of the building and into an outside drain which is set at ground height. After explaining the added work that would need to be undertaken to make the bathroom a wet room, the client agreed to a shower room.

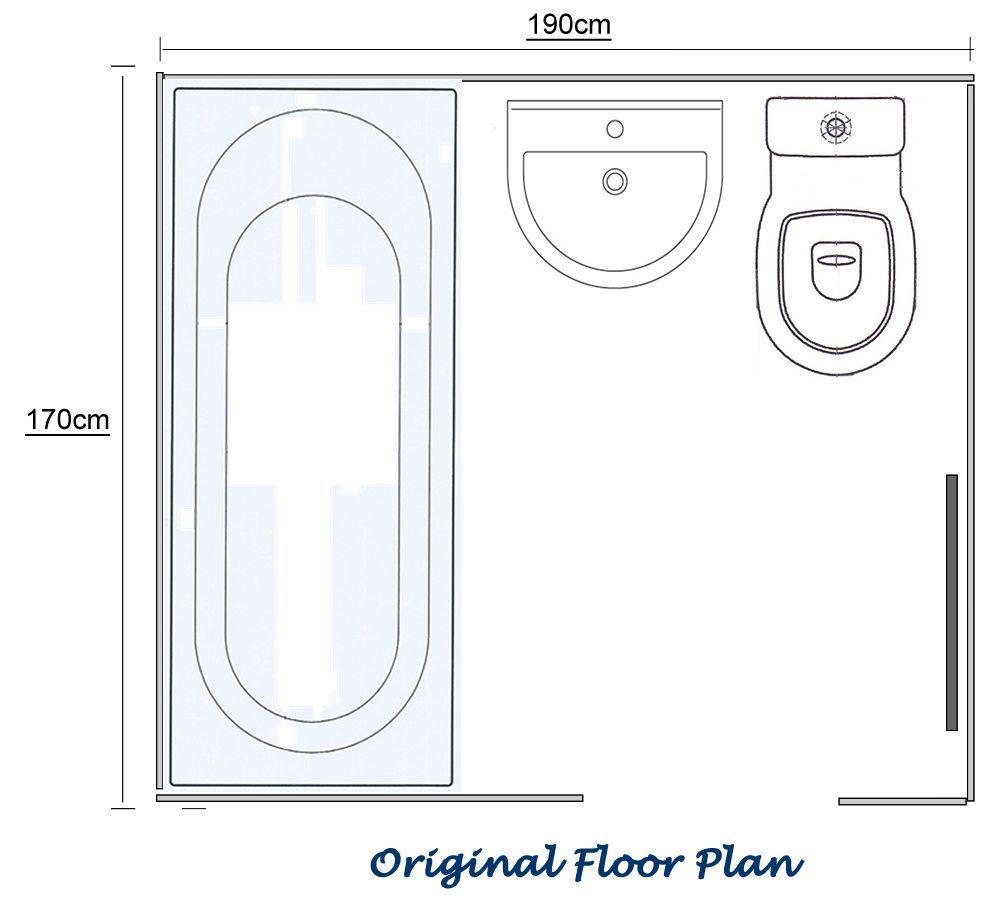
This is the original floor plan which shows a traditional bathroom layout.
Creating More Usable Floor Space
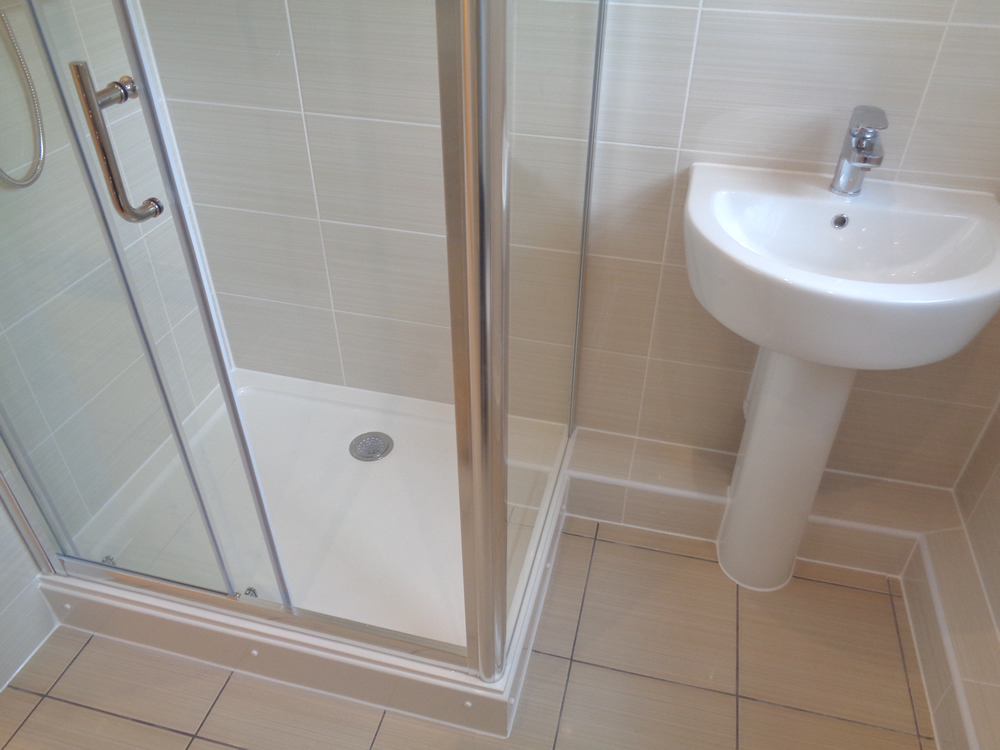
The new shower room floor plan includes a shower 100cm long and 76cm wide. This leaves a sapce between the end of the shower and the window wall which allows for the repositioning of the basin. This opens up more of the floor creating more usable space within the shower room.
The Correct Steps To Convert a Bathroom to a Shower Room
The Correct Steps To Convert a Bathroom to a Shower Room.
The public are misinformed by DIY TV programs about the protocols that need to be carried out to correctly refit a bathroom. The TV shows suggest tiling on top of existing wall tiles.
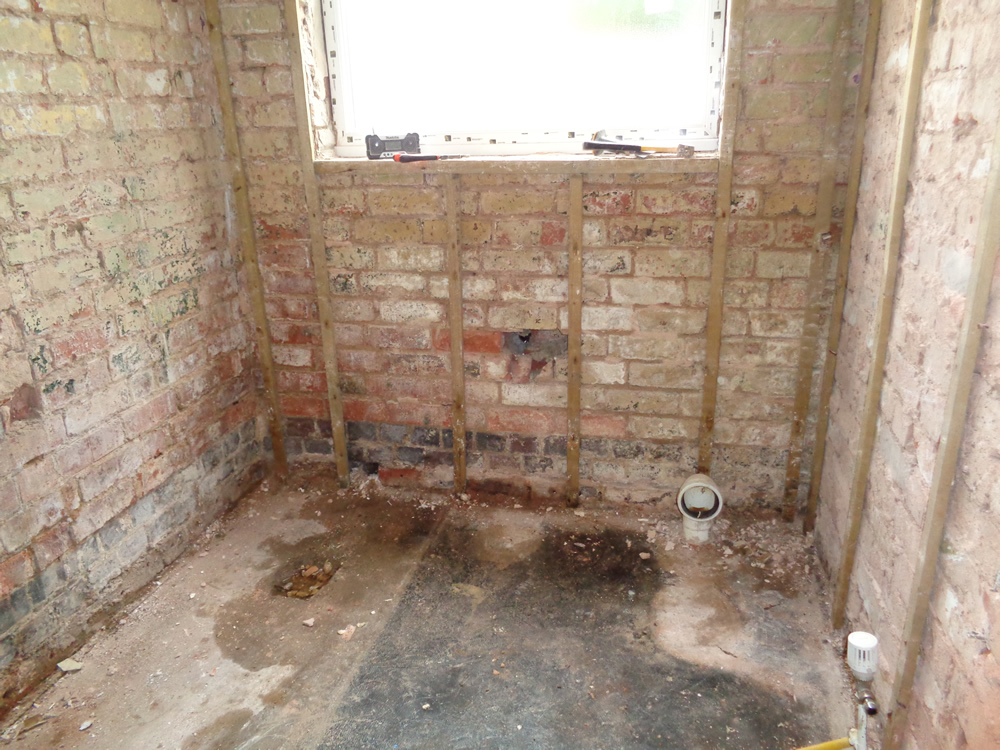
We strongly suggest that you never tile over tiles. The correct steps are first to remove the bathroom suite and tiles. If the plaster or wall bonding falls away with the tiles as it did in this bathroom, remove the remaining plaster from the walls as shown in the image below
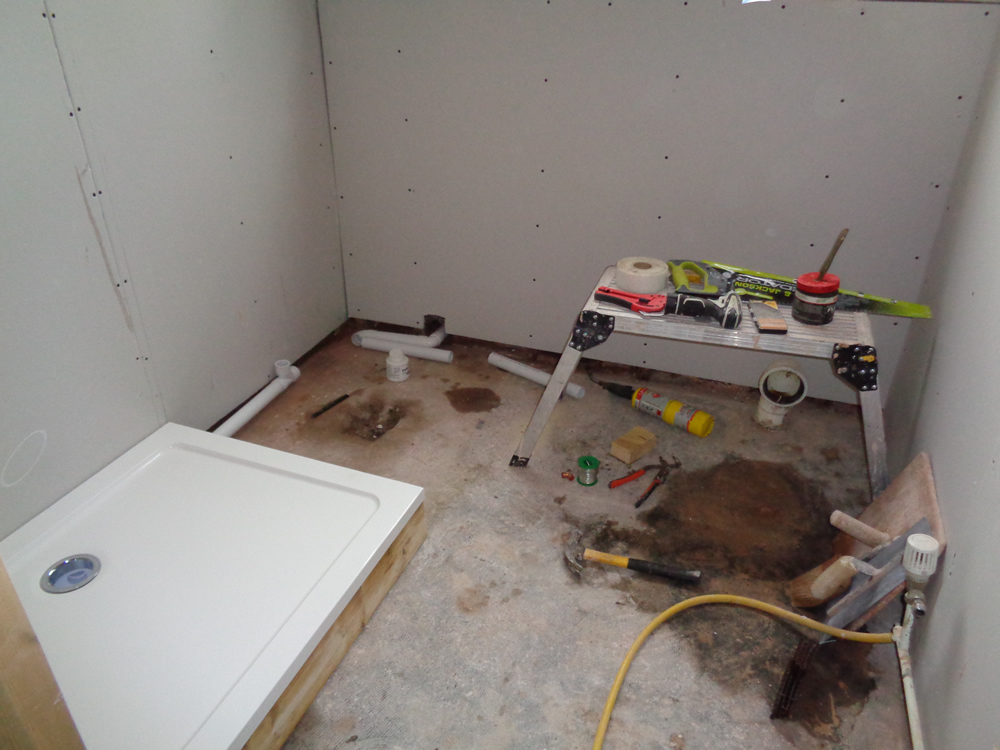
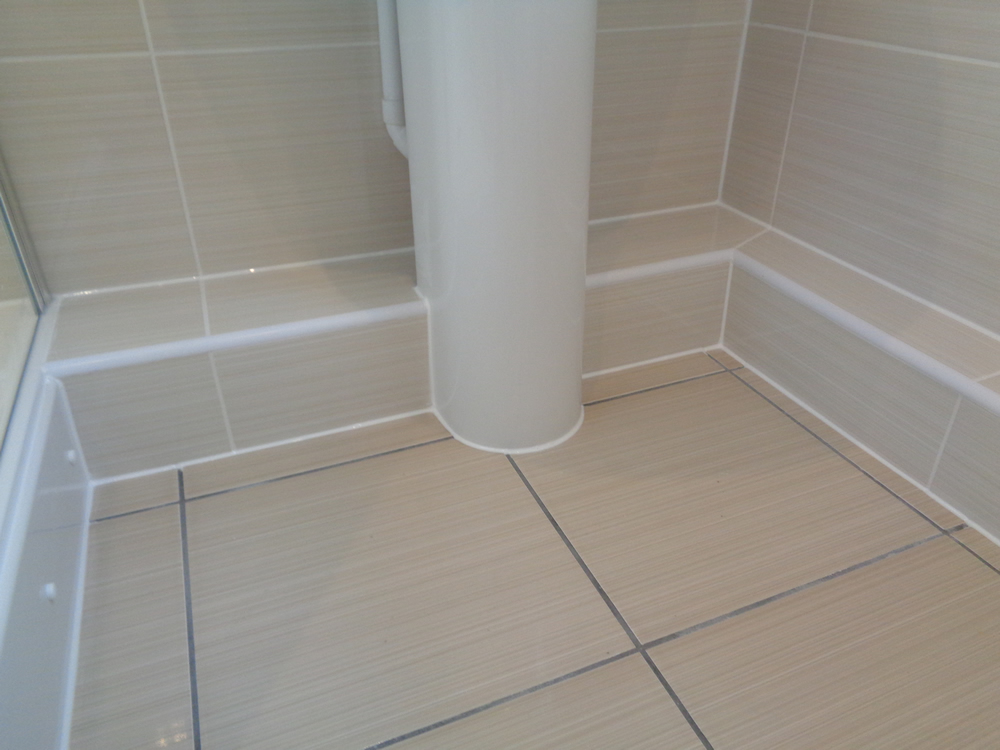
Next the walls should be made flat. An easy cost effective way of achieving this is by plaster boarding the walls, this is a suitable flat surface to tile onto, please note you do not have to plaster the boards. The image below shower the shower tray fitted in place, it has been fitted against the plaster board and silicon sealed to create the first seal. This is an important step that must be carried out before the tiling.
Tiling the Walls and Floor
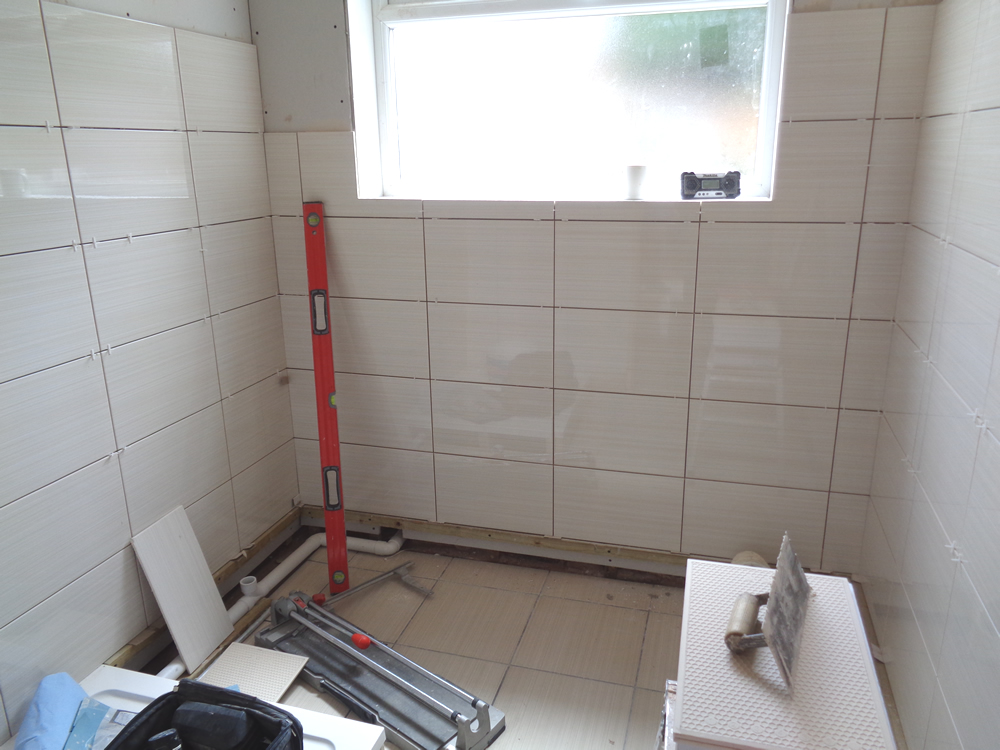
The floor tiles should run under the wall tiles, this can be achieved in one of two ways,
- First tile the floor then the walls – or
- Tile the walls but leave the bottom row, tile the floor, the tile the bottom row.
This is the method we under took with this shower room as you can see from the image below
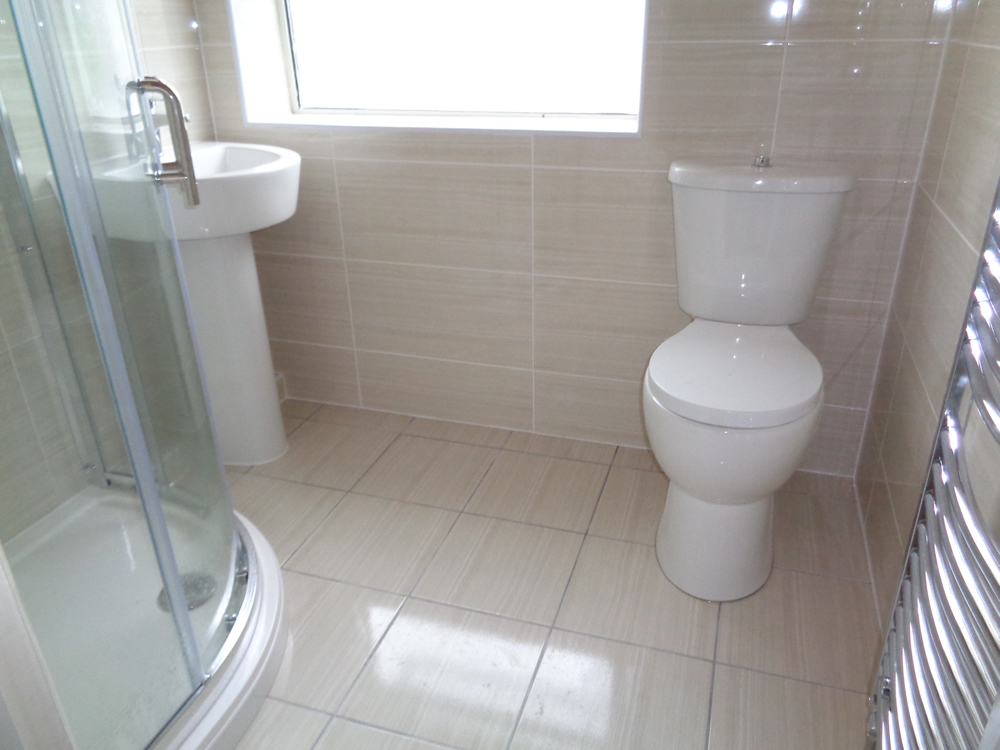
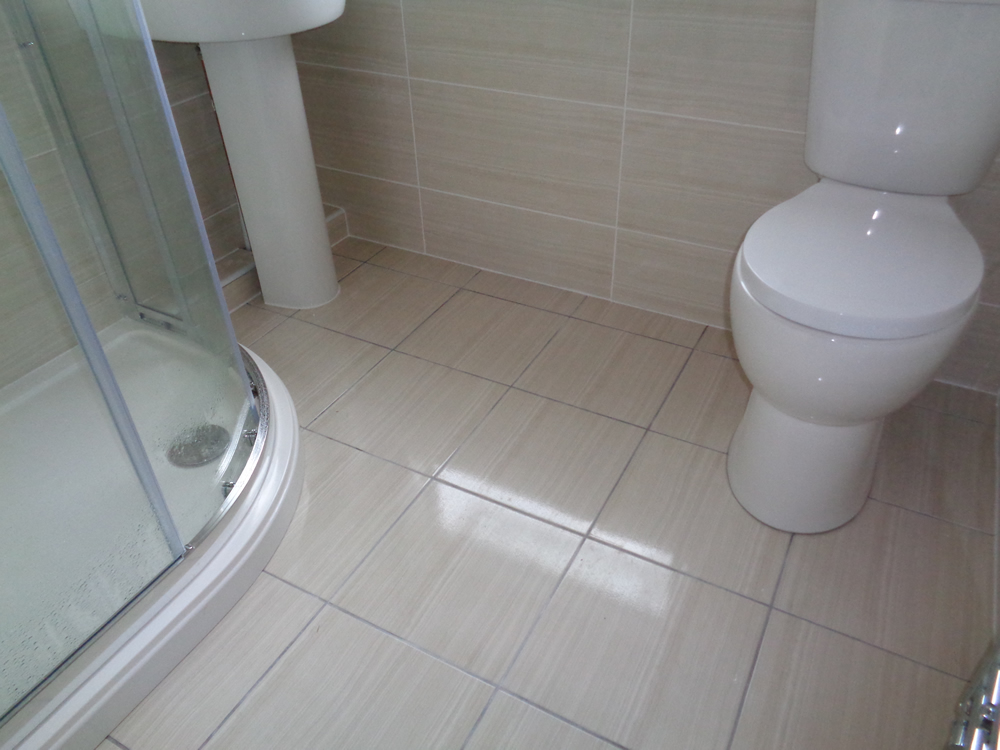
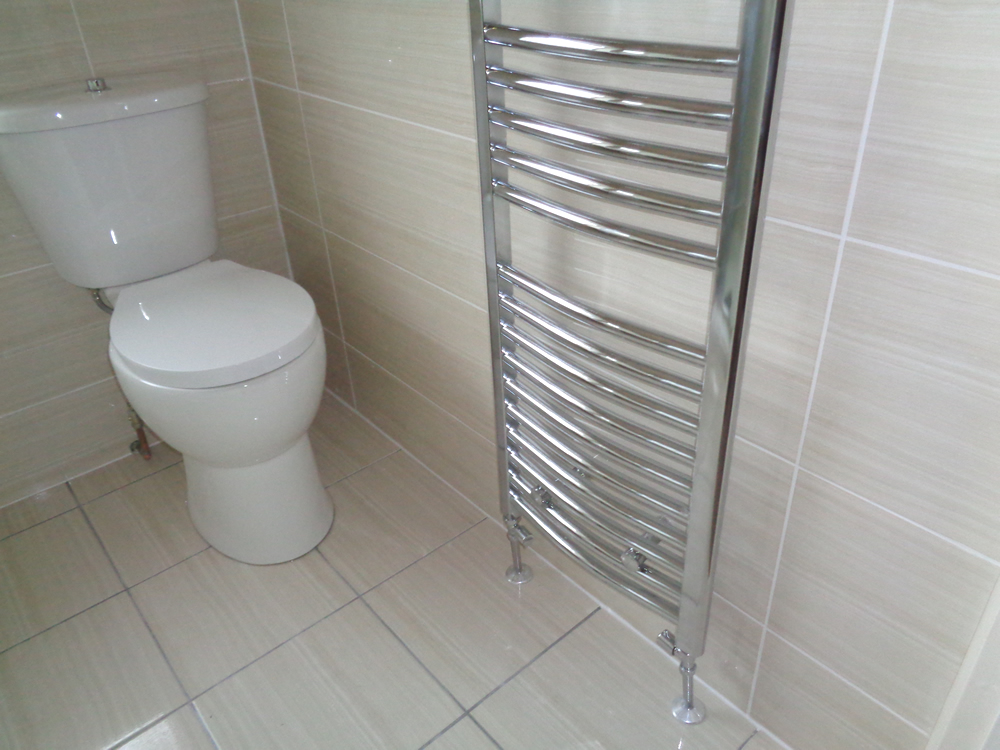
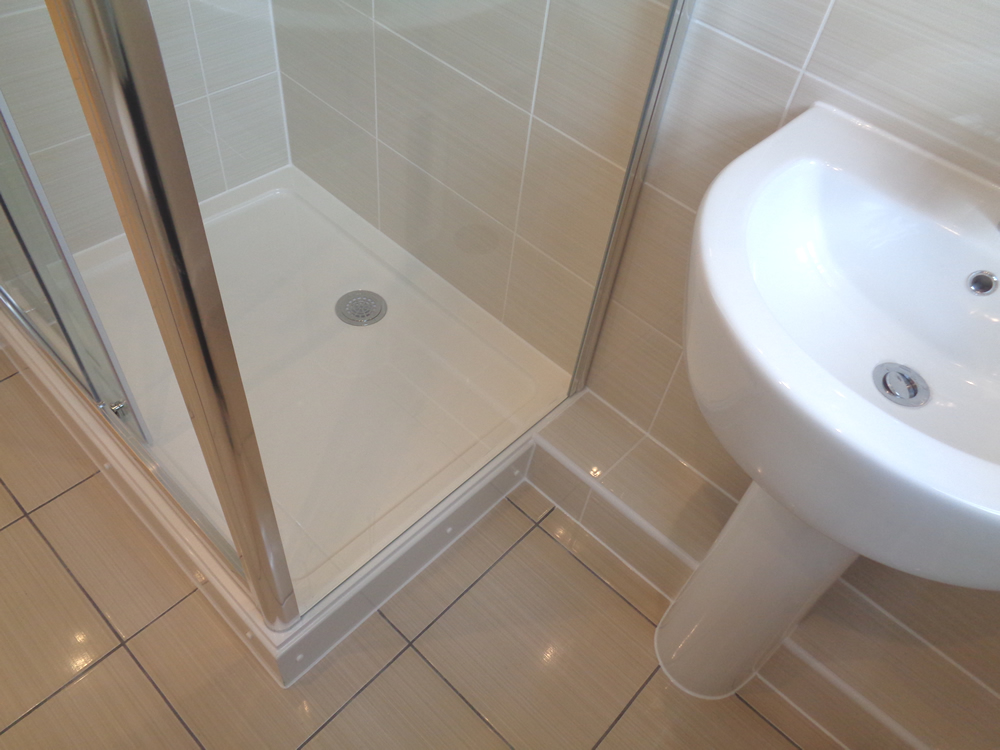
The Completed Shower Room
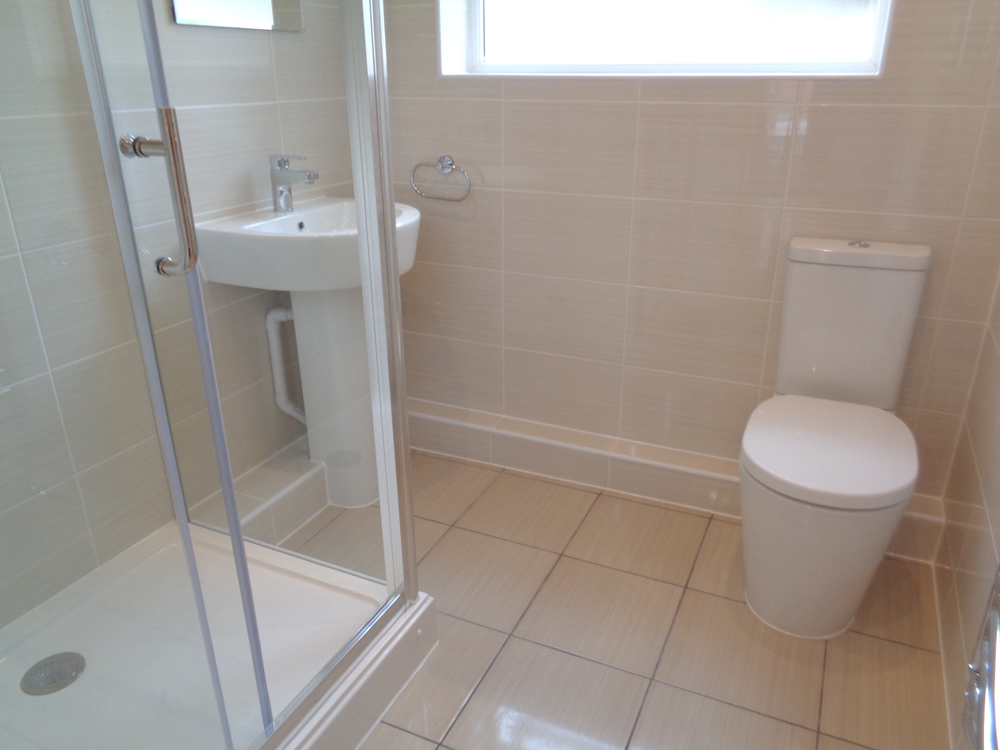
The images below shower how we hide any water pipes and waste pipes.
Video of the work Carried out on this Shower Room
Bathroom Converted to a Shower Room creates more space
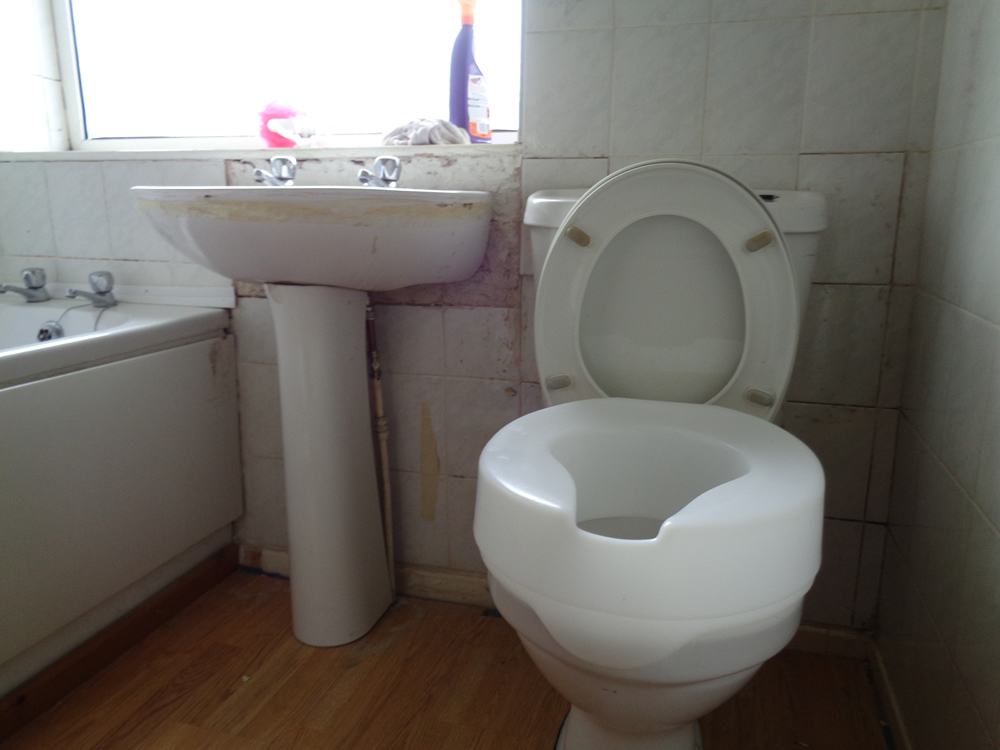
This is a standard bathroom. The width (the wall with the wc, basin and side of bath) 196cm and the length (from the door wall to the window wall) 185cm
The client requested that the bathroom to be converted to a shower room. A bathroom that is converted to a Shower Room creates more floor space. Below is an image of the bathroom before the work began.
Choosing the correct size Shower tray
Many homes have a shower curtain fitted over a bath so the bath can be used as a shower. A standard bath has a standing area of 60cm wide. Therefore a shower of 76cm wide or greater should provide plenty of space. Take into account that the wider the shower, the more floor space it takes up. SO even though you may be able to fit an 80cm or 90cm wide shower, it may impede into the floor area.
For this shower room the chosen shower was a quadrant (curved shower) of the size 100cm long x 80cm wide. This would leave a space of 116cm to the side of the shower tray and 85cm at the end of the shower tray.
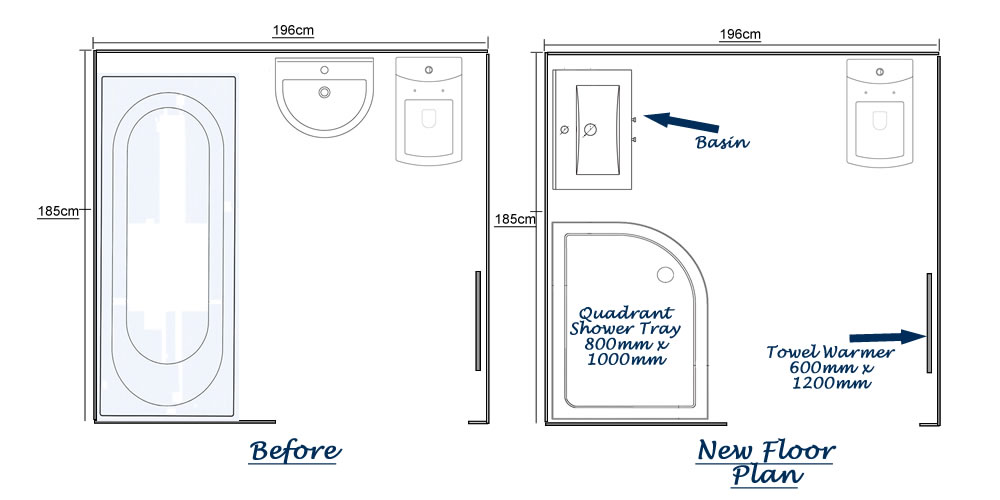
The layout and design of the bathroom placed the shower on the wall adjacent to the hall way. This created a space between the shower and the window wall of 85cm. This space is large to allow the basin to be relocated from the window wall to the area at the end of the shower.
Moving the basin provides three advantages
1 As the basin is no longer located under the window, it is now possible to fit a mirror above the sink
2 There is now a greater floor area allowing more space for movement within the bathroom.
3 There is no wasted floor space in the bathroom
Getting ready for tiling
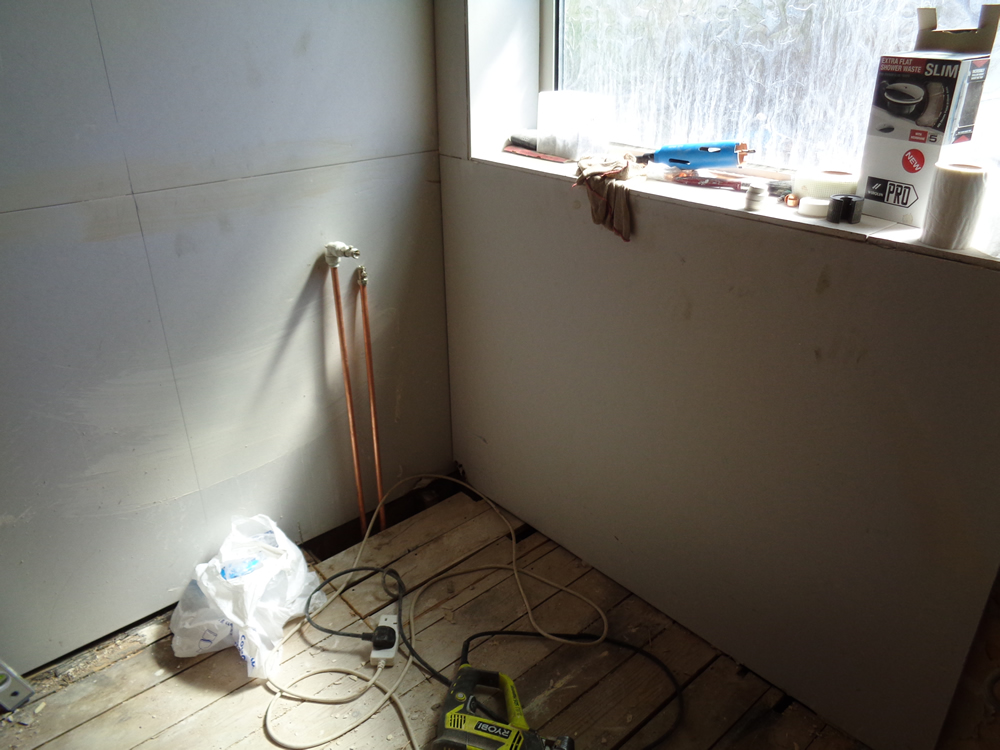
After removing the original bathroom suite, bath basin, wc, radiator and tiles, the walls where prepared for tiling. To achieve this we used plaster board to board the walls. This method creates flat walls. At the same time we plastered the ceiling.
Choosing the correct type of shower
The house has a combination boiler fitted which heats the water for central heating and the hot water. This is known as a high pressure hot water system. This water system works correctly with a hotel style thermostatic exposed shower providing roughly the same amount of water pressure as the mains water pressure (the water coming into the property.
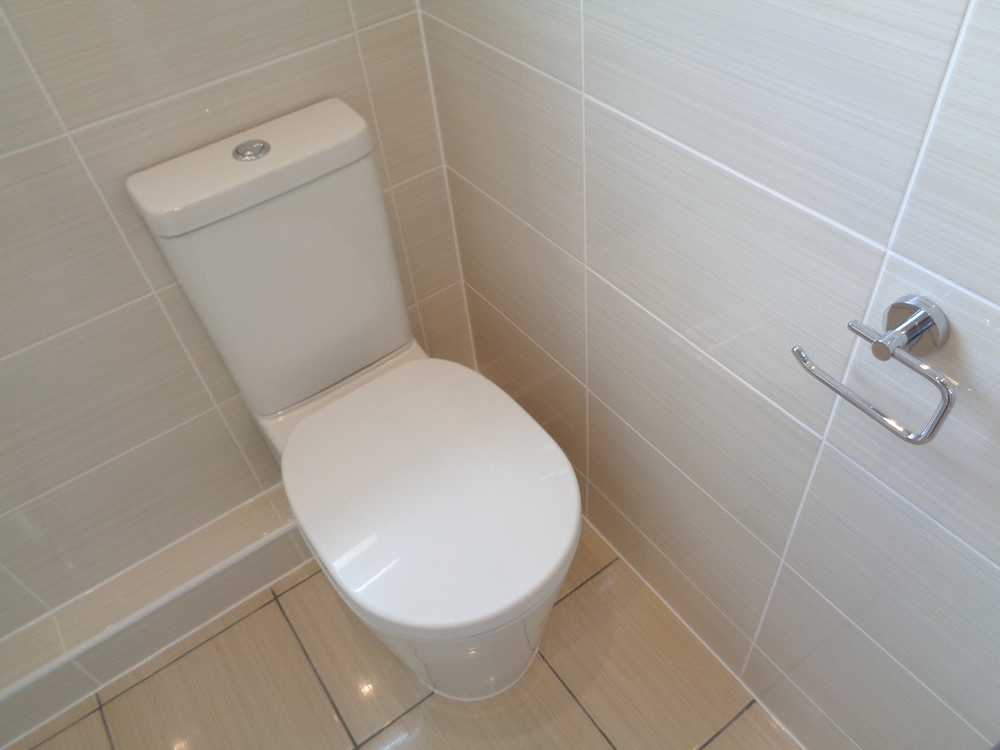
With the walls and floor completely tiled, the shower tray and screen, basin and wc fitted. All areas correctly silicon sealed, the bathroom is complete. Below are the images of the completed shower room.